Mail Merge Gmail is one of the coolest add-ons I have used so far. The reason I am saying this is that it allows you to send emails directly through Google Spreadsheets.
Can you believe it, Google Spreadsheet which is most easier to use, and very user-friendly, and now it will be allowed to send emails as well.
Mail Merge Google Chrome extension allows you to create a mail merge in Gmail with ease and send it in a few simple steps.
How does that happen..? Let’s see that…!
Create Mail Merge In Gmail With Google Spreadsheet
Mail Merge feature is not available in Gmail by default. Fortunately, this extension is designed by “Digital Inspiration which is very useful, and we can get it from the Google Chrome Webstore.
So here we have an opportunity to use mail merge with Google Docs directly and for free. And moreover, it can be performed quickly, and you will have full control over your sent emails.
If you are new to this and don’t know how to get extensions for Google Spreadsheet, then this link is for you.
Video Credits: Amit Agarwal
Send Mass Email in Gmail
It allows sending a mass email with Gmail itself in just a few clicks. It is very useful for those who send emails daily to multiple people.
And this will be going to save some extra time, and one can be more productive. All the Bulk emails can be sent in one click.
Moreover, you can personalize the body content and attachments to any particular recipient.
Multiple Gmail Contacts can be added to the Google Spreadsheet by using this Mail Merge extension to create a group of Gmail Contacts. So it is always a better idea to import the group of contacts in just a few clicks, instead of a copy-paste job.
Now let us get into action and get this job done and create Mail Merge in Gmail with Google Spreadsheet.
Step 1. Login To your Gmail.
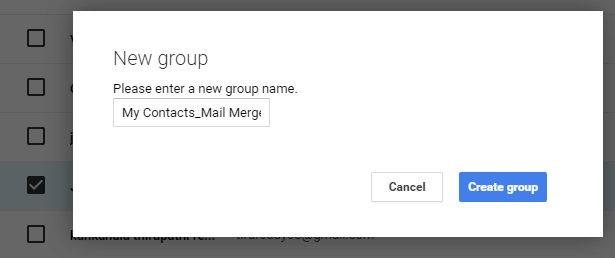
Step 2. Navigate towards your Contact Section, and form a group of those recipients to whom you want to send mass emails. Check out the below image for better insights.
Step 3. Now though we have already created a group in Gmail, Open a New Google Spreadsheet from Google Drive.
Step 4. Now we need to install the extension, here is the add-on created by CTRLQ Go through that link and click on install. This will create a Mail Merge extension for your Google Spreadsheet.
Step 5. Go to the Add-Ons menu and click on “Create Merge Template”, this will create a Mail Merge Template in your Google Spreadsheet.
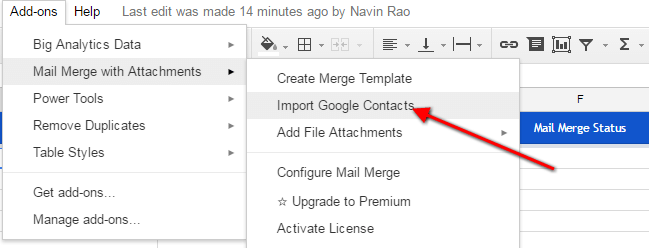
Step 6. Now click on the Add-ons menu and the “Import Google Contacts“.
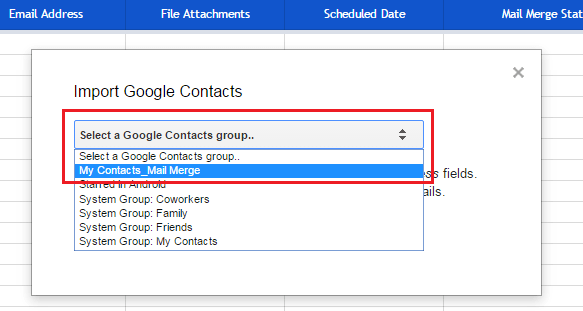
Step 7. This will open a Dialog Box, from where we can import the contacts, select the group that we have created as a group in Gmail a few minutes back.
Step 8. Now this will import all your contacts into the Google Spreadsheet just in a blink.
Step 9. Our contacts are already imported, so now it’s time to add some attachments, which we want to send in the email to any recipients.
The good thing is, that it is not compulsory to send the same attachments to all the recipients. Attachments could vary for all the users.
All we have to do is copy a link to the file in the section of that particular recipient. Or there is also an easy way to do this.
Select Add-on – Mail Merge with Attachments – Add File Attachments
Now we will have three options to import the attachment, choose one from where you want to import the files.
Step 10. Now, the next section is the Schedule Section, where we can schedule the emails we want to send. This can be done by just mentioning a day and time in the required field. However, it is not compulsory if you want to send the emails instantly after composing them.
Step 11. Now it is time to send the Email, to do that let us compose an email by again going back to the
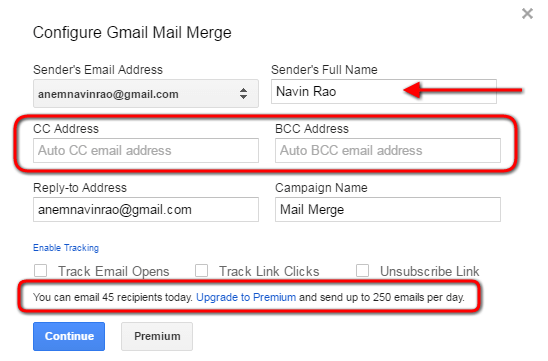
Add-on menu – Mail Merge with Attachments – Configure Mail Merge. A dialog box will open, there we can add some CC and BCC as well if required.
As you can see in the above image we send emails to 45 recipients with a free version and to send more than 250 emails per day, we need to upgrade to the premium one.
Step 12. Click on Continue.
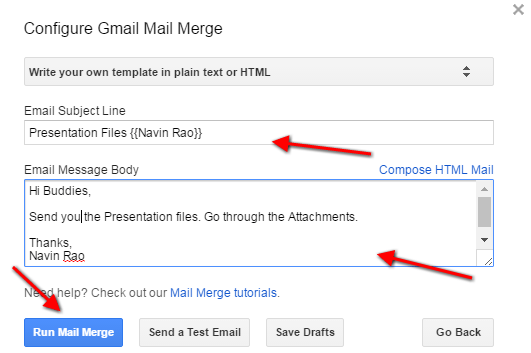
Step 13. It will take you to the next dialog box where you have to compose the email body and a few details.
Step 14. Once done by writing the email, Click on “Run Mail Merge” to send the emails to all the recipients. It will just take a few seconds, and Bingo, all the emails forwarded to the recipients.
You will also see the confirmation message in the Google Spreadsheet.
As we can see in the image, the Mail Merge Status, the sent date, and time are also well.
I hope this helps, do let us know if you face any issues with that in the comment section below. Alternatively, you can also use some bulk email sender software.
Navin Rao
Navin Rao always like to explore new things. His Blog QuestionCage covers the topics like WordPress Tricks, Google, Social Media, Blogging and SEO Tips which simplifies the whole blogging process. He loves to tweak things with WordPress and boost the loading speed of the website. know more About him