Now the question is how do we do that, turning hobby and passion into a profession. Well, monetizing the blog could be the best way for it.
And when it comes to monetizing, one Ad network comes to mind, that is Google Adsense.
Google Adsense born in 2003, and it is serving their advertisements on many publishers blogs and website. It is a known as a high paying Ad network.
Many publishers are getting help from Google Adsense and making a living out of it as well.As mentioned above it is the high paying CPC Ad Network so bloggers are able to earn a handsome income through it, many professional Bloggers too recommends the same.
How To Setup Adsense Page Level Ads
In added to that now Google Adsense has introduced PageLevel Ads as well to add some more advantage to the publishers.
Adsense Page Level Ads are very effective and works great to increase your revenue. As it serves sticky Ads, which are definitely better than the scrollable Ads.
Page Level Ads are sticky but it is removable(avoidable) from the screen just in a tap by the viewer if they don’t want to see it.
So user experience is not affected by it at all. In fact, as Adsense has the rich quality ads so those won’t distract the users. It is the priority for every blogger to give a proper user experience, as visitor means a lot.
By Default Adsense Page Level Ads won’t be active, we have to do it manually.
Setup Adsense Page Level Ads for your Blog
Step 1. Login to your Google Adsense Account
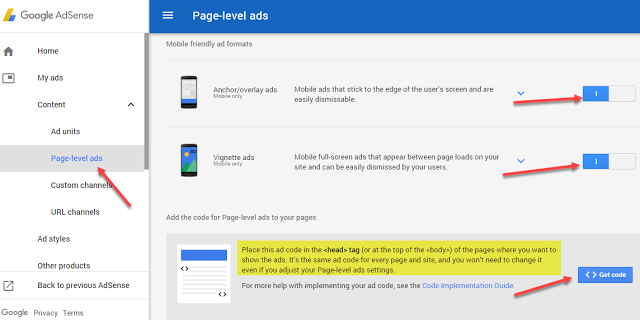
Step 2. Navigate to
My Ads –
Page-Level ads. Here we would be able to see two types of Page-Level ads, those are
Anchor/Overlay Ads
Activating these ads, we are allowing it to get aligned at the bottom of the device, These are the called sticky ads, which do not disturb the user experience at all.
As it occupies very less space of the screen and can be easily dismissable by the user any time if they do not wish to see those, just with a single tap or a slide.
For Publishers – It will give more Adsense Impressions, which would be helpful to generate more revenue. So these ads are highly recommended.
Vignette Ads
These ads occupy the whole screen of the device, while the site loads. once loaded, it could be easily dismissable by the user.
The impressive thing about these ads I found, it displays while the site page loads in the background, So if your site takes some time to load even then if won’t offend the user and in between this ad will be displayed, In fact, the user won’t come to know the loading time of the site.


