So you have landed right as here we will see a step by step guide on how to add a custom domain to Blogger.
And for those who don’t know how to create a Blogspot blog, no need to worry at all. We have a step by step guide to how to create a blog in Blogger as well.
Advantages of Custom Domain
It is always good to have a custom domain instead of a free domain name blogspot.com. It is definite as sounds much better compared to a free domain (blogspot.com).
In fact, apart from that, there are many advantages of it, again that would be another article.
Okay..!!! coming back into the main topic setting up a custom domain is a part of blogger.com. That’s the main purpose of creating this step by step guide.
So, let us dive in and convert a free domain to a custom domain.
How To Add A Custom Domain To Blogger with GoDaddy: Step By Step Guide
If you have already created a blog in blogger. Let us see how to set up custom domain on blogger with GoDaddy in ease.
Note: Following the below steps without missing a single one will set up the custom domain successfully.
Step 1. Log in to your Blogger
Step 2. Navigate to Blogger Dashboard – Settings – Basic
Now from the right side, settings will display.
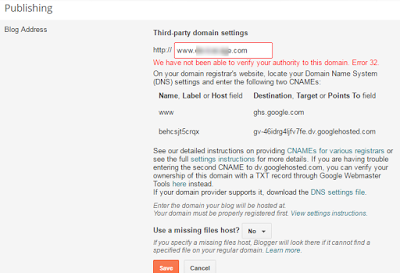
Step 3. From the Publishing section, Blog address will be there along with the blog name, click on Edit. check the below image.
Step 4.Once click on Edit, we will be able to edit that section and now enter that custom domain.
Which you bought from GoDaddy replacing the free domain, and save it.
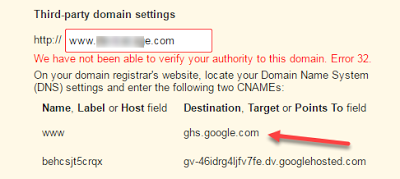
Step 5. An error will appear after hitting the save button shown in the image below.
“We have not been able to verify your authority to this domain. Error 32” Don’t Panic at all. You are going right.
Step 6. Now log in to your GoDaddy Account,
Step 7. Click the Manage button from Domains.
Step 8. A window will appear where the purchased domain could be seen. It will be in the form of a hyperlink show in the image below, click on it.
Step 9. Now a window will appear, where we could see three tabs, select the
DNS Zone File.

Step 10. Now scroll down to a bit, till the
CName (Alias) section and from
www Click on edit, a pop-up window will be opened.

Step 11. Now go back to the blogger.com, where we have left the error window, and copy the
Points To will appear like “
ghs.google.com“

Step 12. And now come back to GoDaddy and paste it in the Points To section and www in the Host section. And Click on Finish Button. Now the Pop-up window will be closed.
Step 13. Now we will be able to see the Points To data has been added, Click on Save Changes.
Step 14. Once clicked on save changes a confirmation window will appear, click on OK
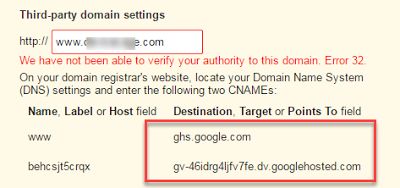
Step 15. Now we need to add the Zone Record, so again come back to the blogger settings(Basic) page and copy the data below the
www (Name, Label or Host Field) first and later we need to copy the data from
(Destination, Target or Points To Field).

Step 16. Now let’s go back to Go Daddy and click on “Add Record” in the Zone File section, a window will open Add Zone Record, Choose CName (Alias) from the Record type dropdown.
Step 17. Now paste the copied data in the Host section and the Points To Data in the Points To section in Zone Records. Please check the image below for avoiding confusion.
Step 18. Click on the Finish button to close the pop-up window.
Step 19. Click on Save Changes to save the changes done with the zone records.
Step 20. Go back to blogger.com and click on “view settings instructions”, it will open a new tab.
Scroll a bit down and click on “Use a Top-Level Domain”, here we are going to add the IP.
Step 21. We will be able to see 4 IP addresses there, now copy one of them, and go back to GoDaddy. It might appear like the image below.

Step 22. As we need to add those IP addresses, so click on Add Record,
Step 23. A window will open, choose A(Host) from the drop-down and enter “@” in the “Host” section and paste the copied IP in the Points To section and then click on Add Another to add all the remaining 3 IPs.
Perform the same action with all the IPs and finally, click on Finish.
Step 24. Once clicked on Finish, the pop-up window will be closed, and we could be able to see all the IP’s got added to the records.

Step 25. Now the Final Action we need to do is forwarding the domain, in order to do that switch to
“Settings” tab and from the
Forwarding section and click on
“manage” Step 26.
 It will open a window click on
“Add one now” to our domain.

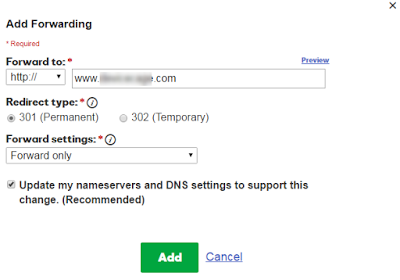
Step 27. It will again open a window as Add Forwarding, and add here the custom domain which bought from GoDaddy and click on Add.
Step 28. And then click on
the Save button.

Step 29. Now go back to the blogger and click on the Save button.
That’s it now the free domain will be replaced with the custom domain. It will show a message that the changes will be effected in 48 Hrs, but these days it’s getting done in a few minutes only.
Do let us know if this step by step tutorial on adding a custom domain in blogger helped you, we would love to read your comments.


thanks for the great post